The following are samples of what you'll see in Hubble-II
Each display has multiple configuration options, of which just a few examples are shown here
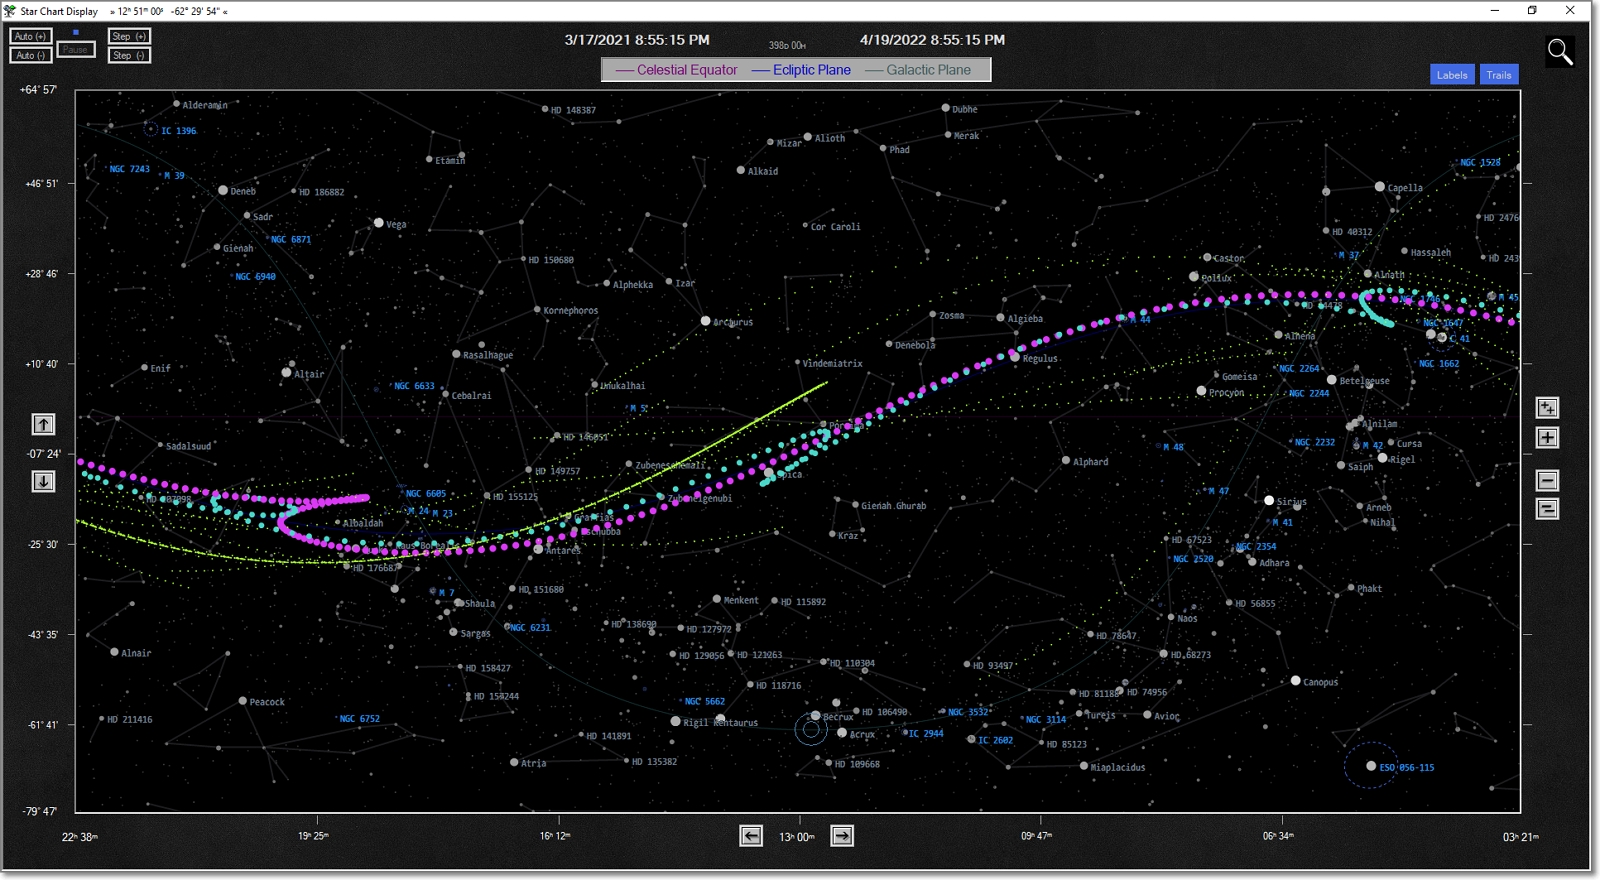
Star Chart Display
The Star Chart presentation shows a 2D flattened representation of the entire sky,
just as you would find in an astronomy sky reference.
This example screen also shows how you can animate the display across ranges of time. Here you can see the Retrograde Motion of Mercury and Venus as they move amongst the stars. A few comets are also shown moving against the background of stars.
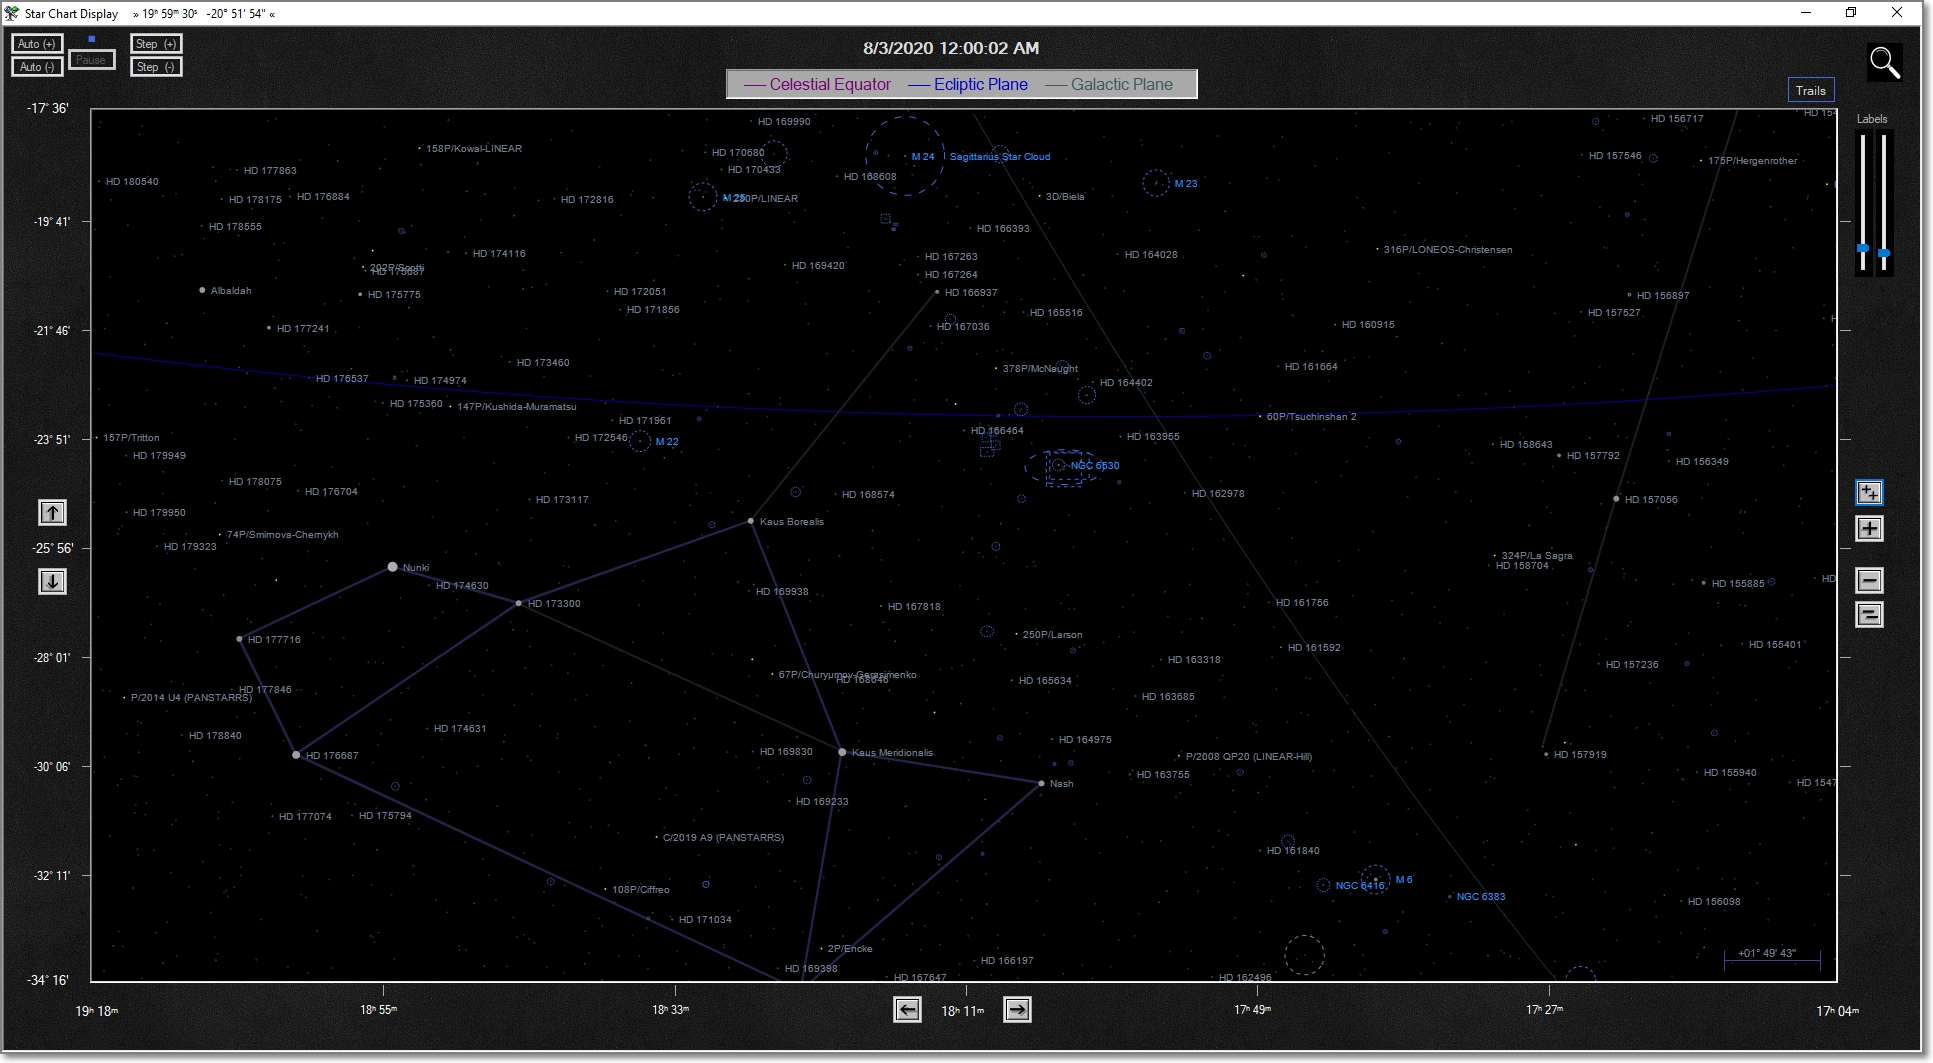
The second example below shows a static of the Star Chart display. As can be seen here, the Star Chart displays Object Labels for Stars,
DSOs, Planets and Comets. The 'Diffuse Objects' (M 25, M 18, NGC 6445, Sagittarius Star Cloud, IC 4701, etc) are drawn showing their defined Boundaries.
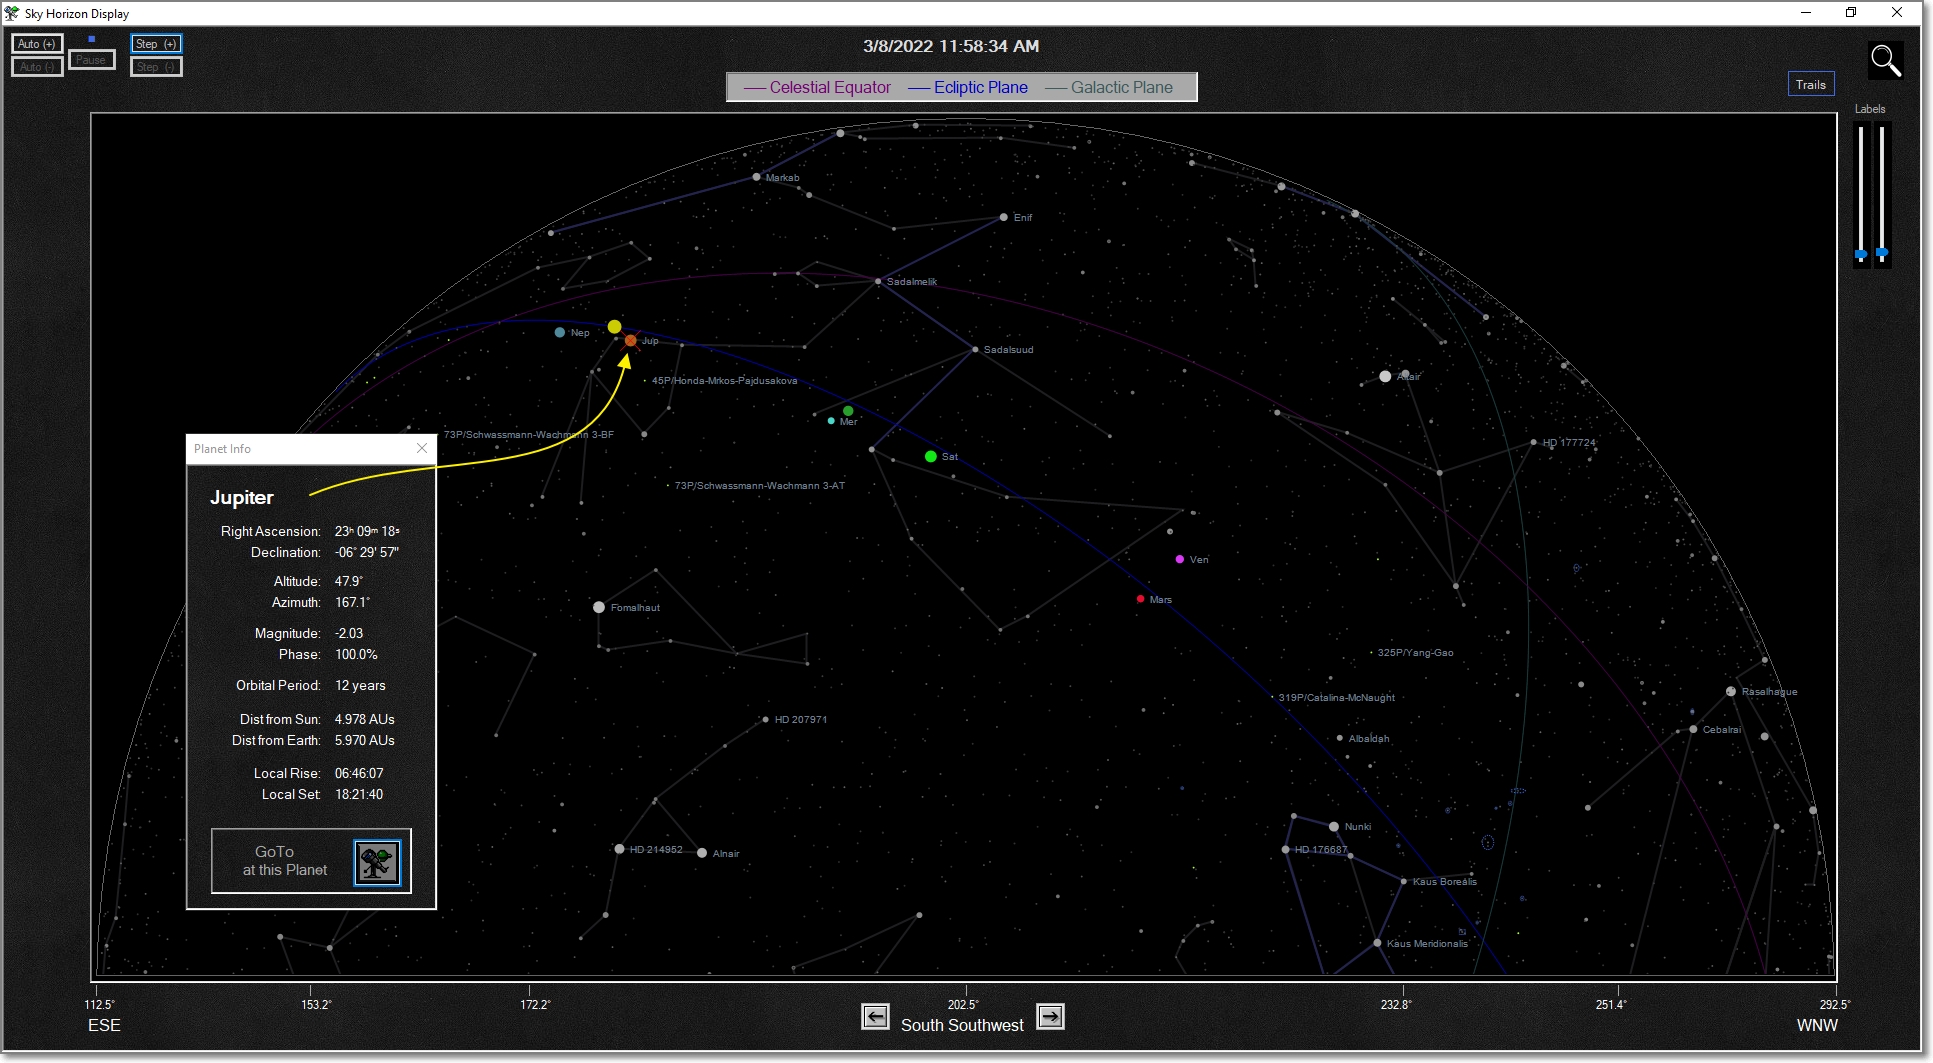
Horizon Display
The Horizon View shows a 2D flattened representational view of the sky. Imagine you are standing outside in a field, looking out at the horizon, viewing the sky from shoulder to shoulder.
This example screen shows how you can identify any object in the sky just by clicking on it.
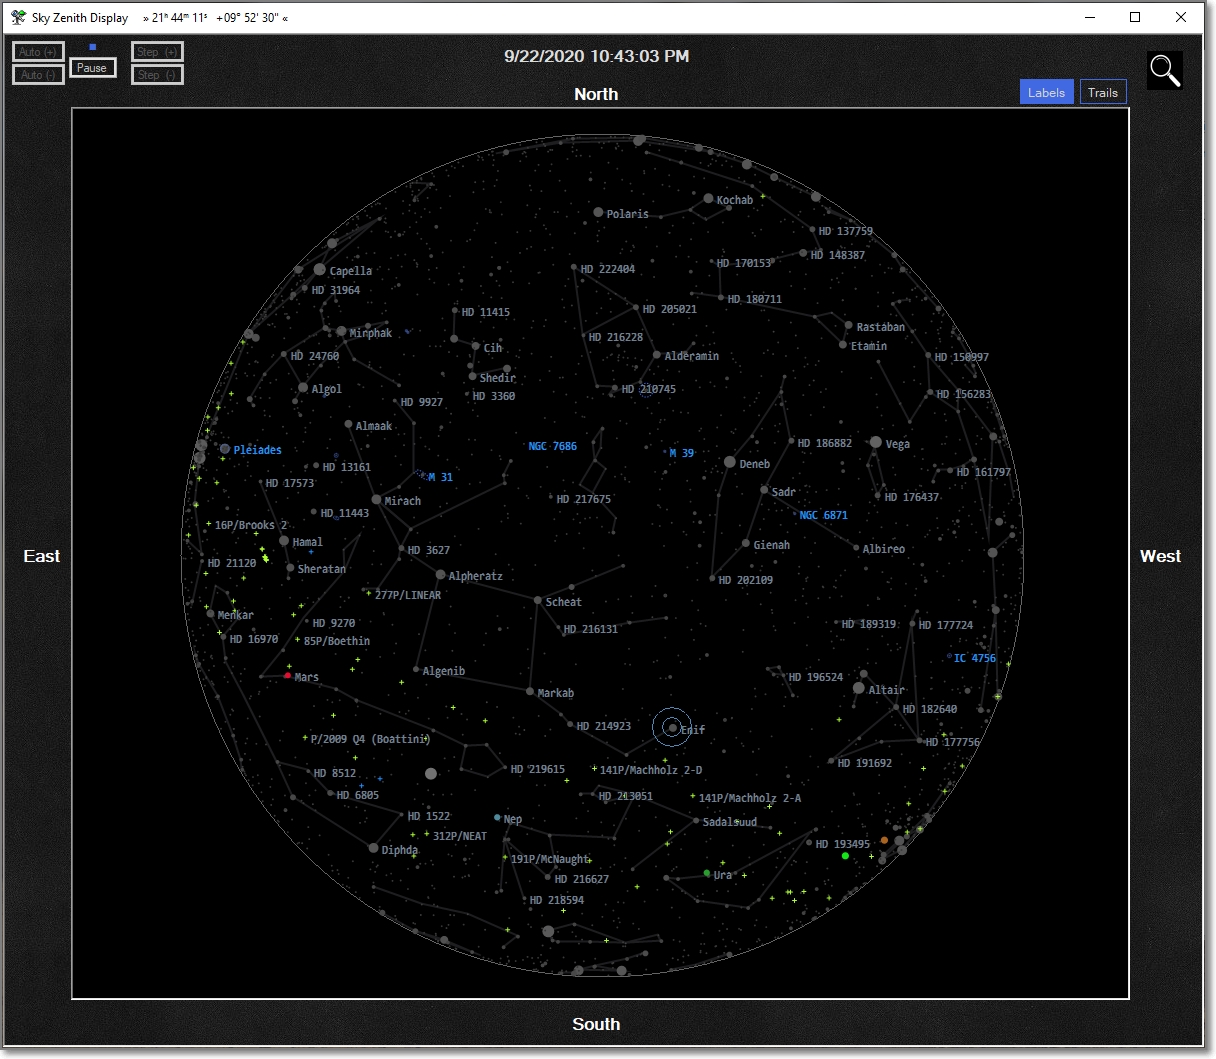
Zenith Display
This presentation shows a view of the sky, as you would see lying on your back looking straight up.
The edge of the circle represent the 360° horizon all around you.
The example here shows how the 'Enlarged Stars' option can give an enhanced visualization of the star brightnesses.
This option can be turned off to display stars as they would look to the naked eye.
The display also shows a Double Ring Circle. This indicates the currently aimed position of a Telescope Mount that is being Controlled / Monitored by Hubble-II.
Solar System Display
This display shows our Solar System, with the Planets and Earth's Moon orbiting the Sun.
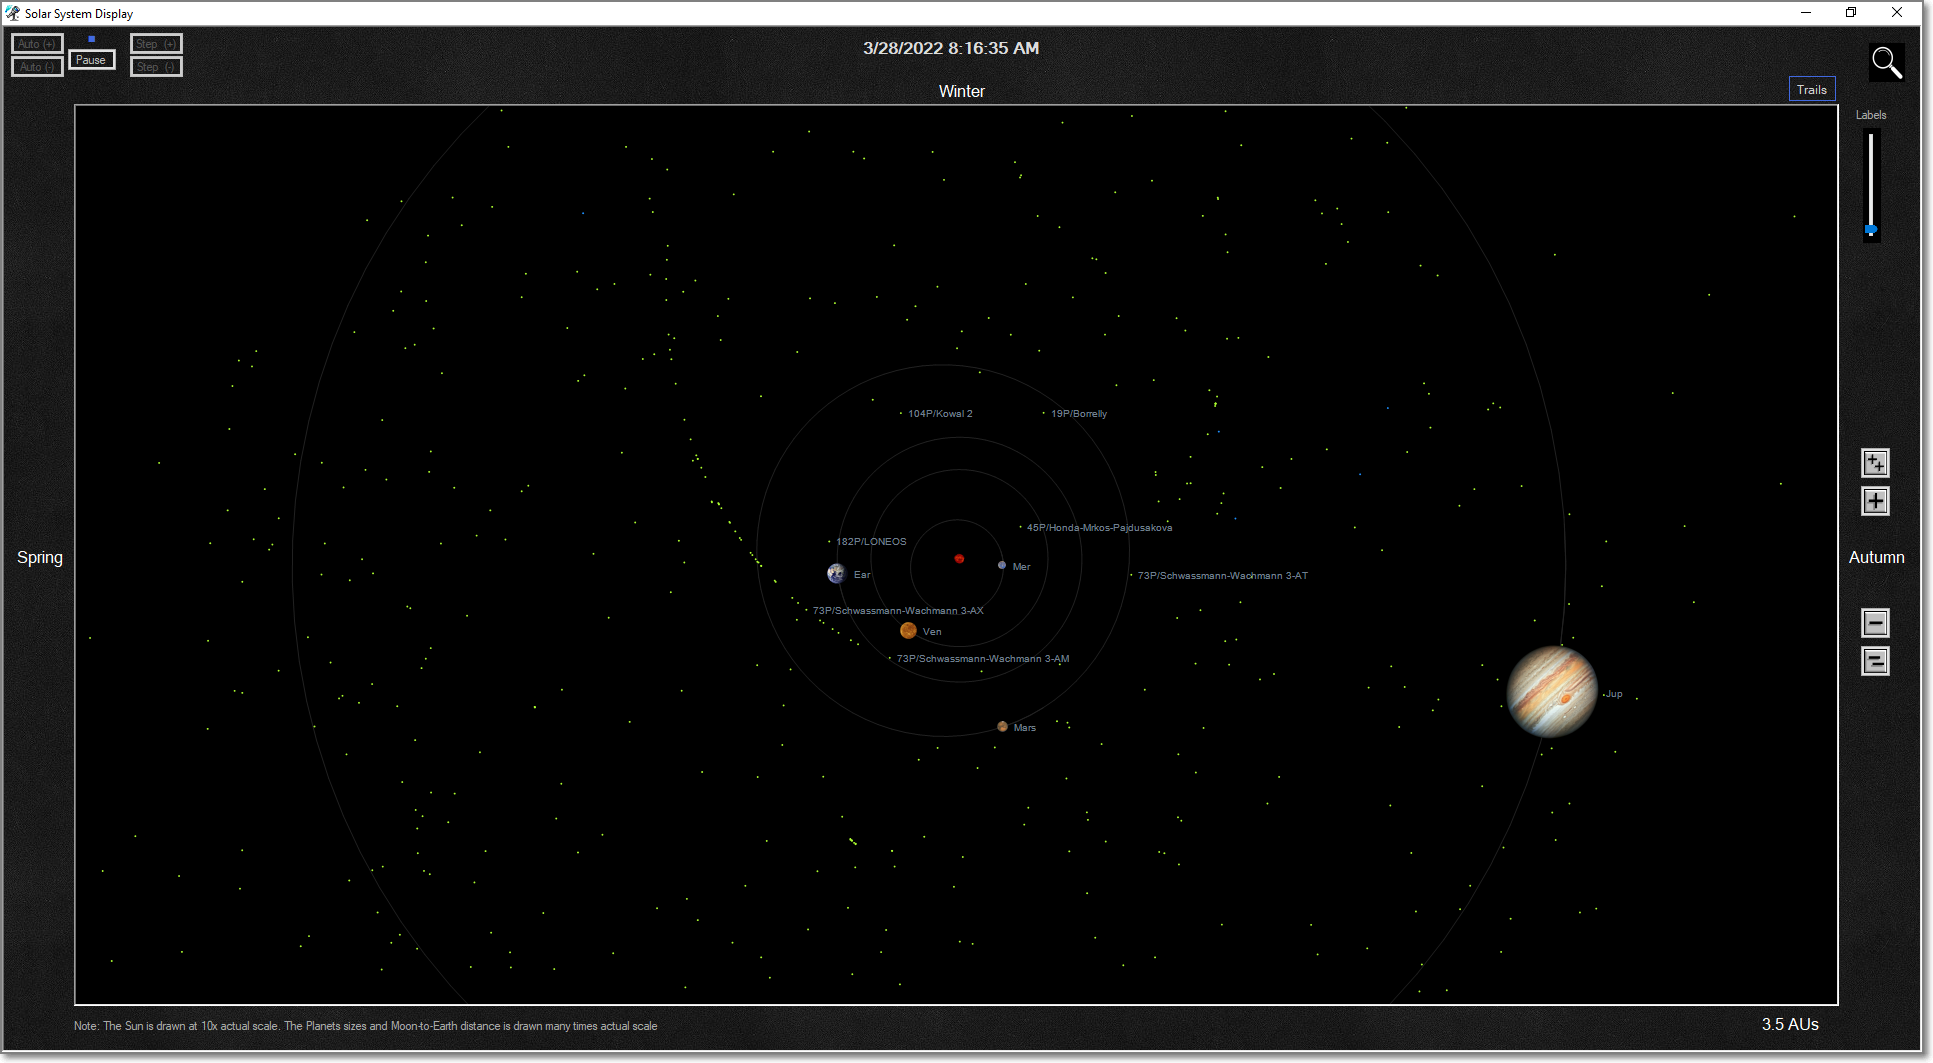
The first two examples show different levels of zoom. Note that when zoomed in, the Moon is shown as it revolves around the Earth.
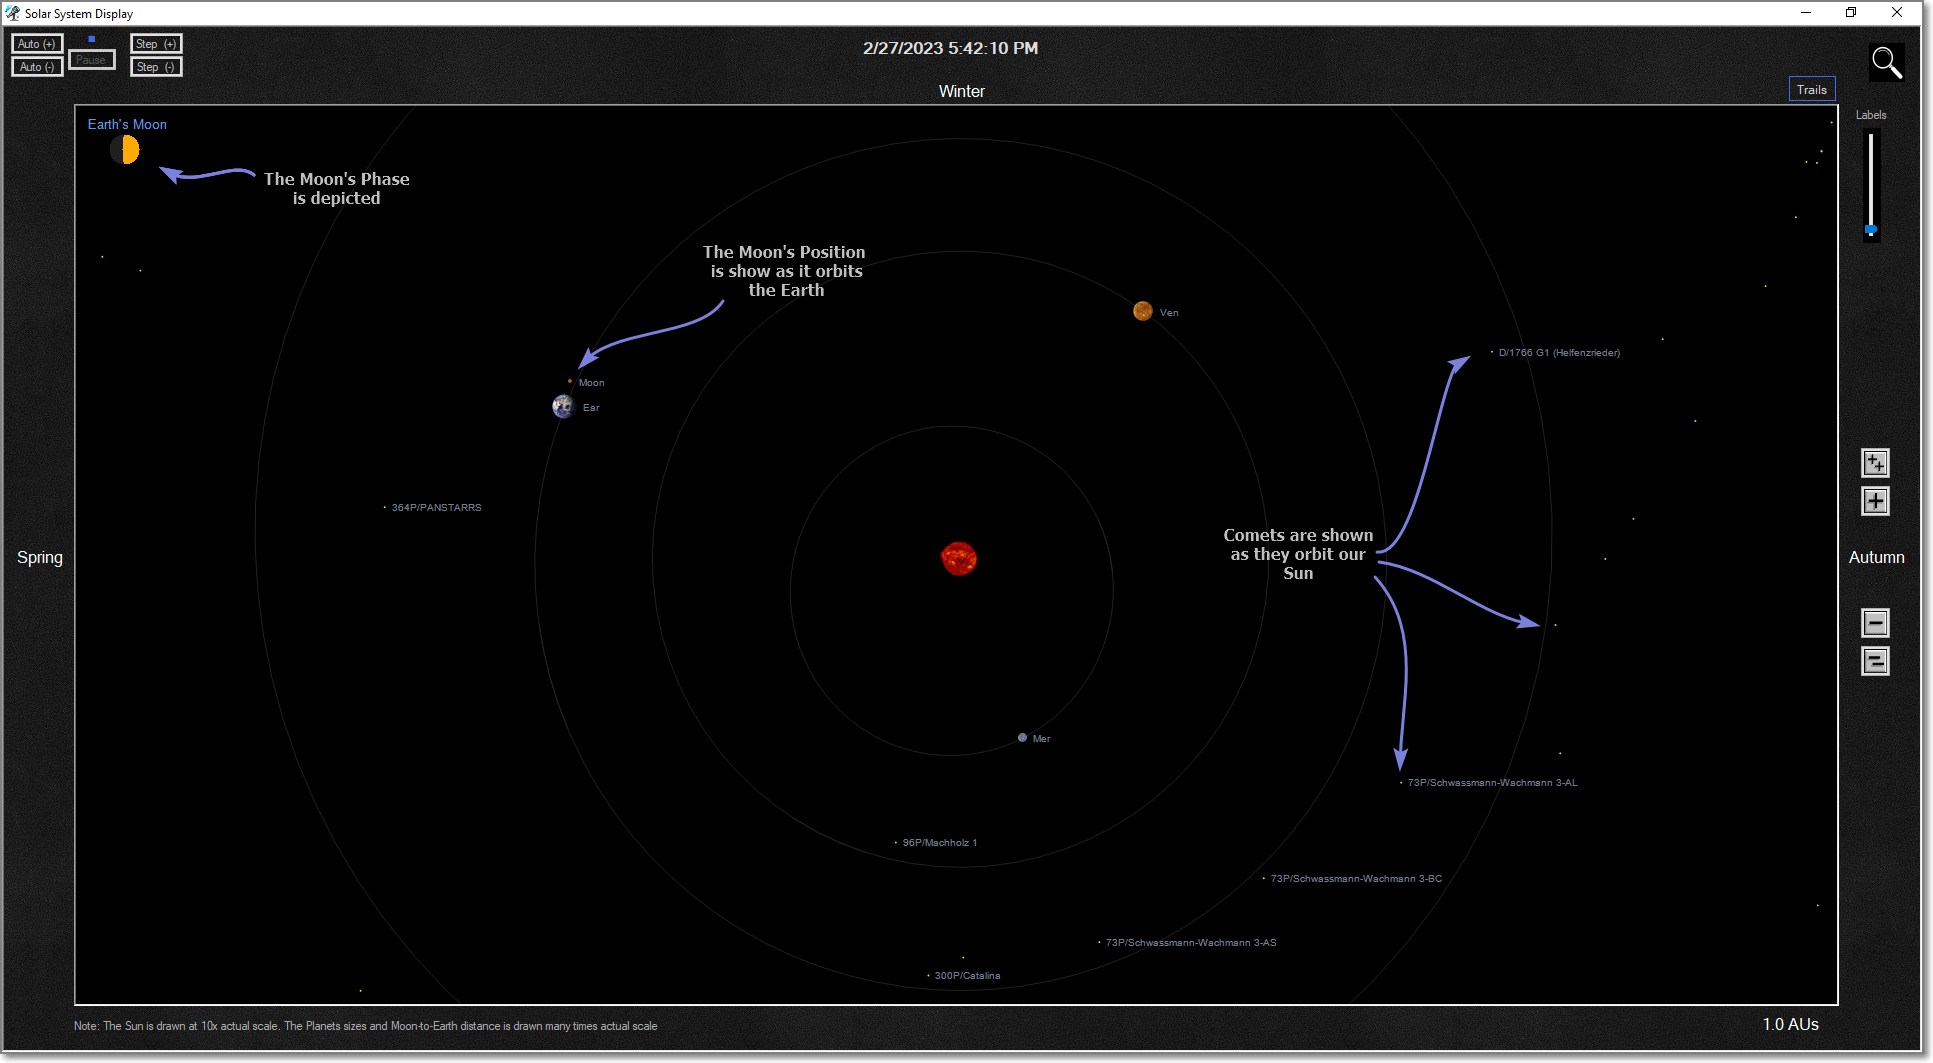
Zooming out, away from the Sun, includes more Planets and Comets in the field of view.
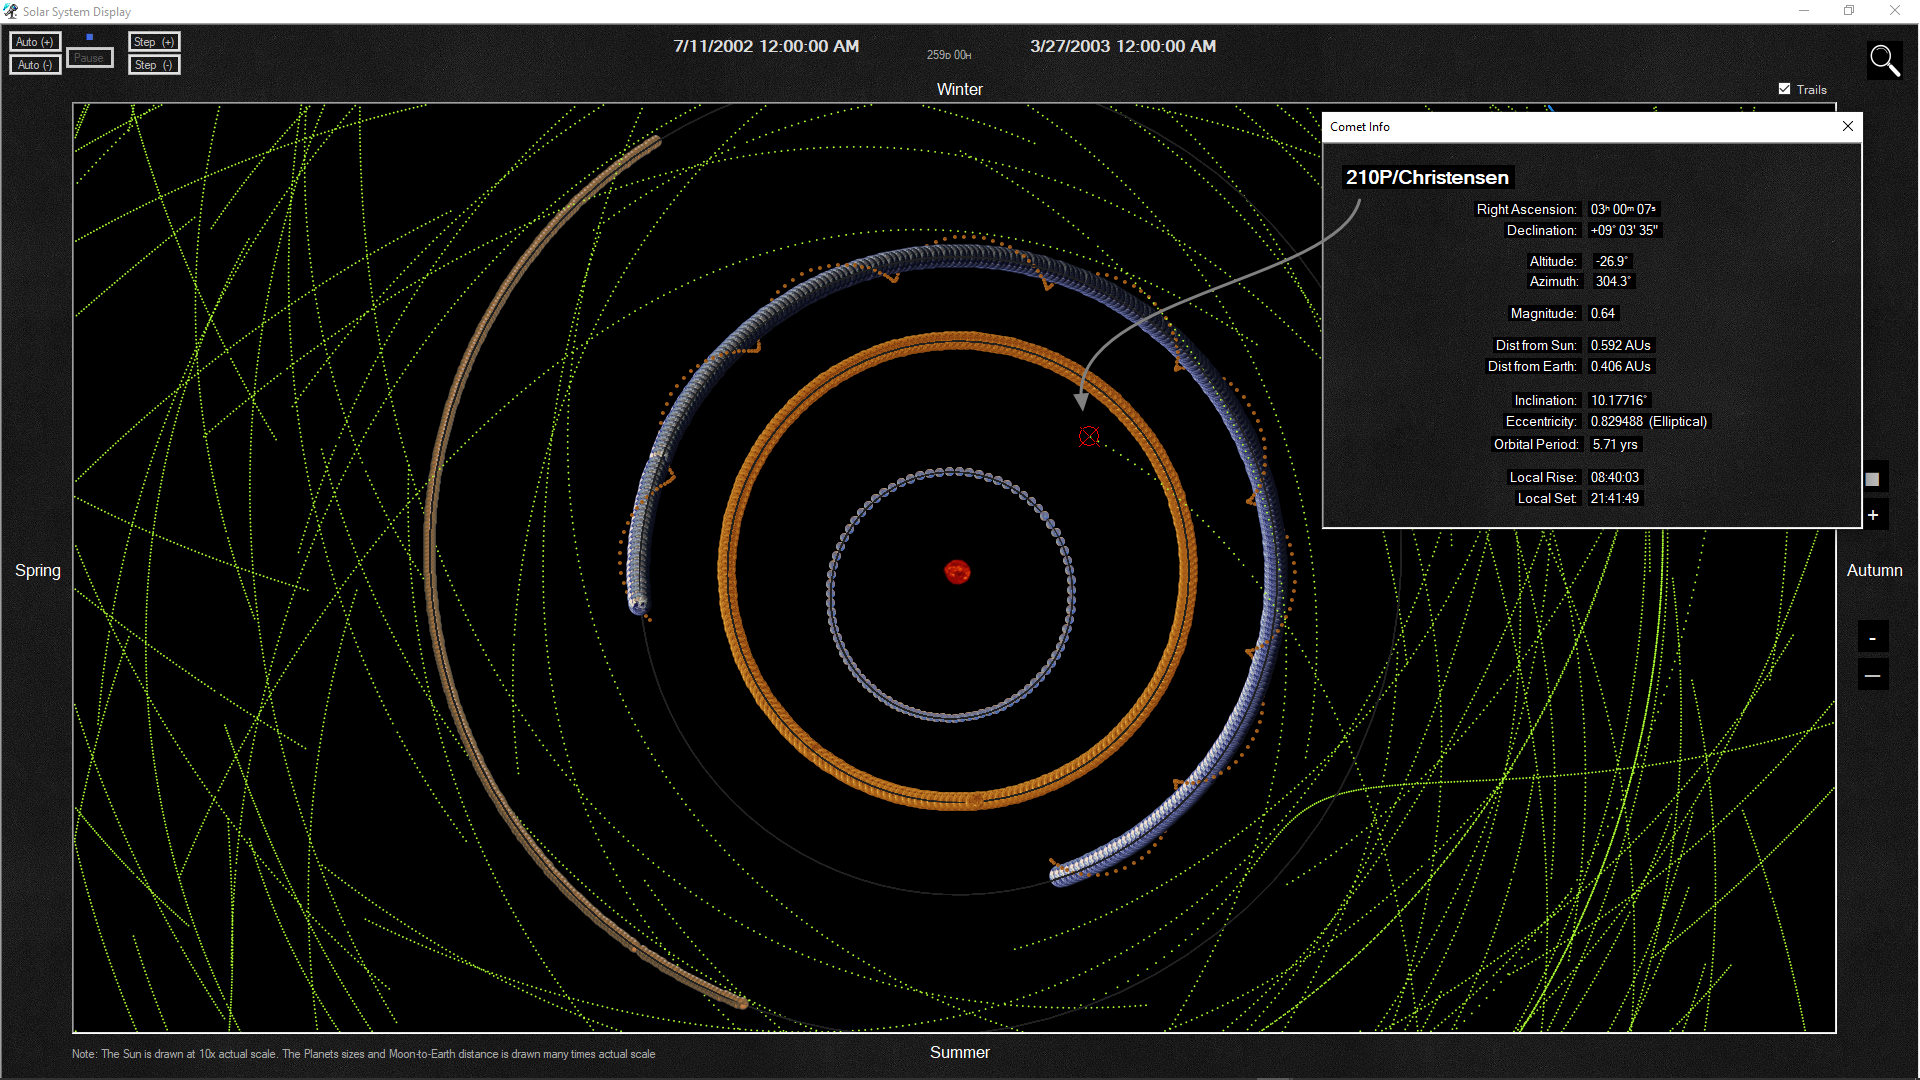
This 3rd example shows how 'Trails' can be enabled to give a better visualization of the movement of the Planets and Comets.
Also demonstrated is how objects on the displays can be identified with the click of the mouse.
Jupiter's Moons Display
This presentation shows the position of Jupiter's Moons as they orbit the planet.
The view can be adjusted to reflect the reversed-view as seen through Schmidt-Cassegrain, Newtonian, and Dobson telescopes.

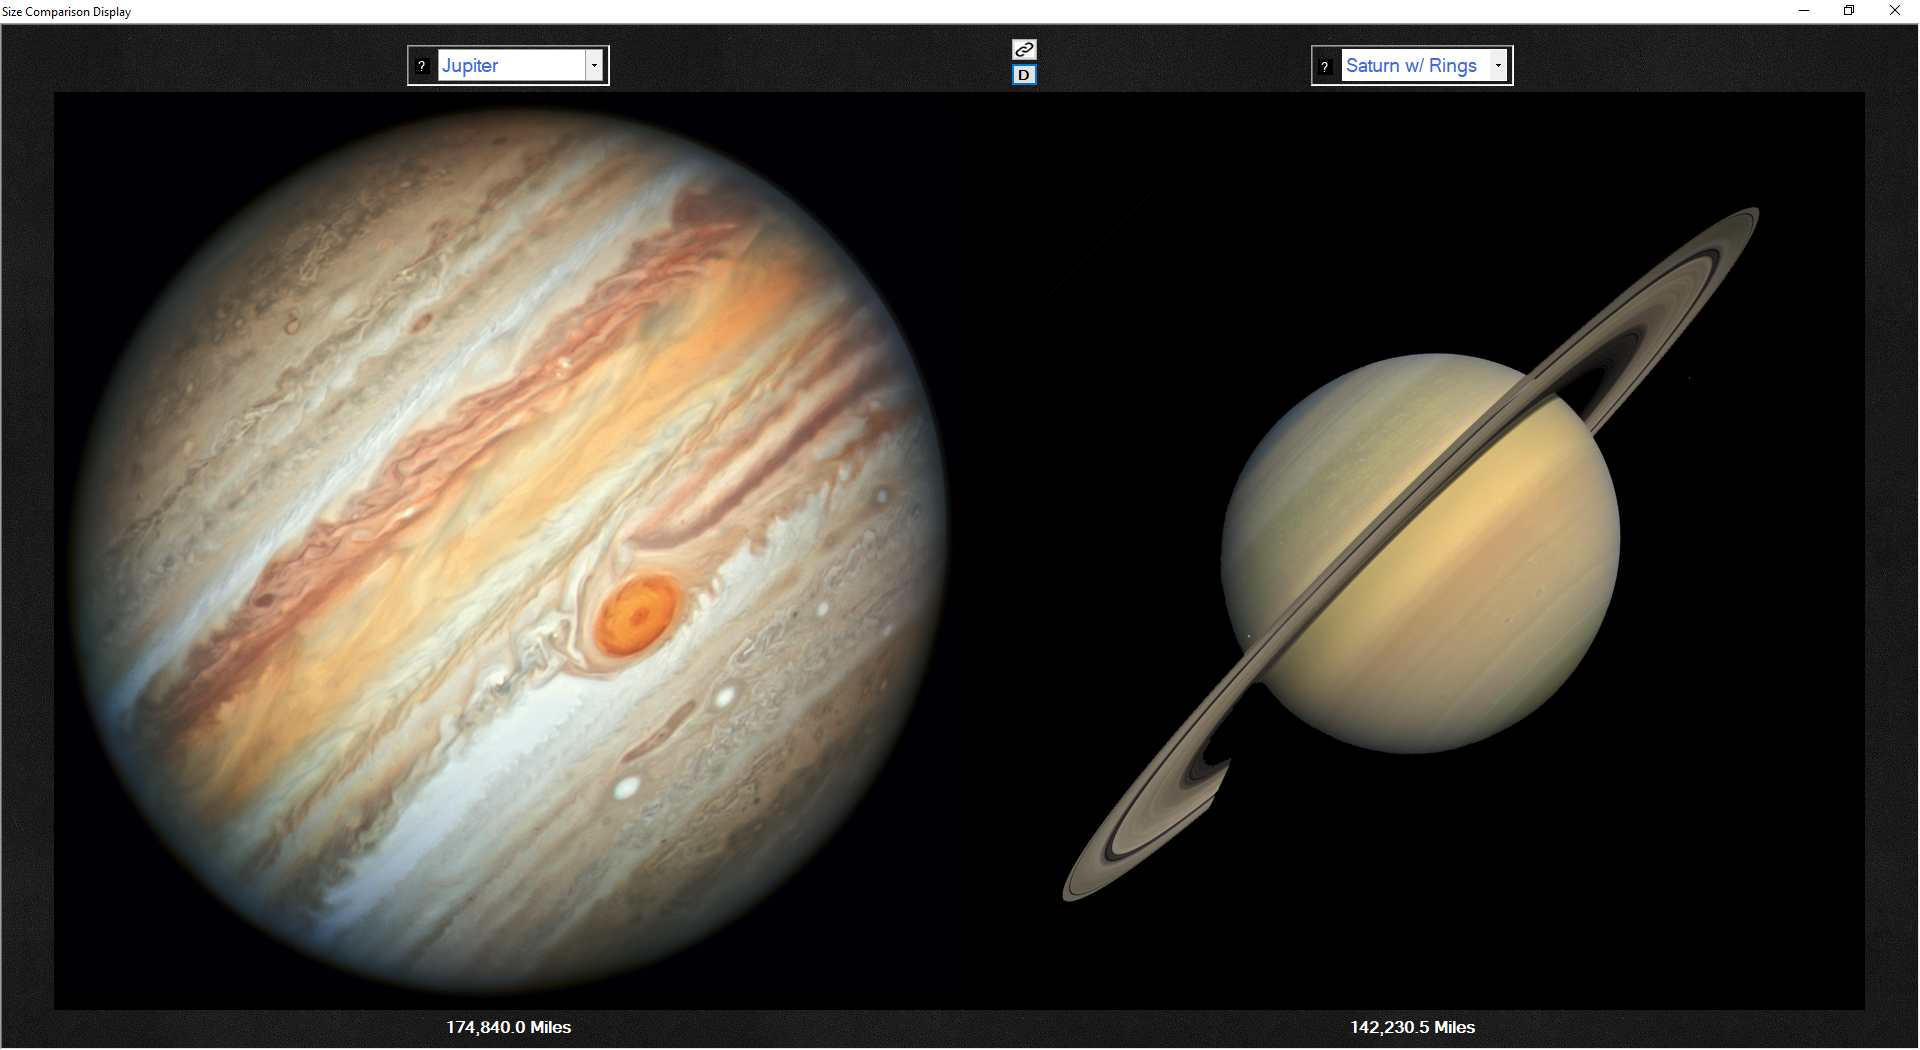
Size Comparison Display
This display shows the relative sizes of Planets, Moons, and Stars.
It's a great tool for putting into perspective the huge size difference between the celestial bodies.
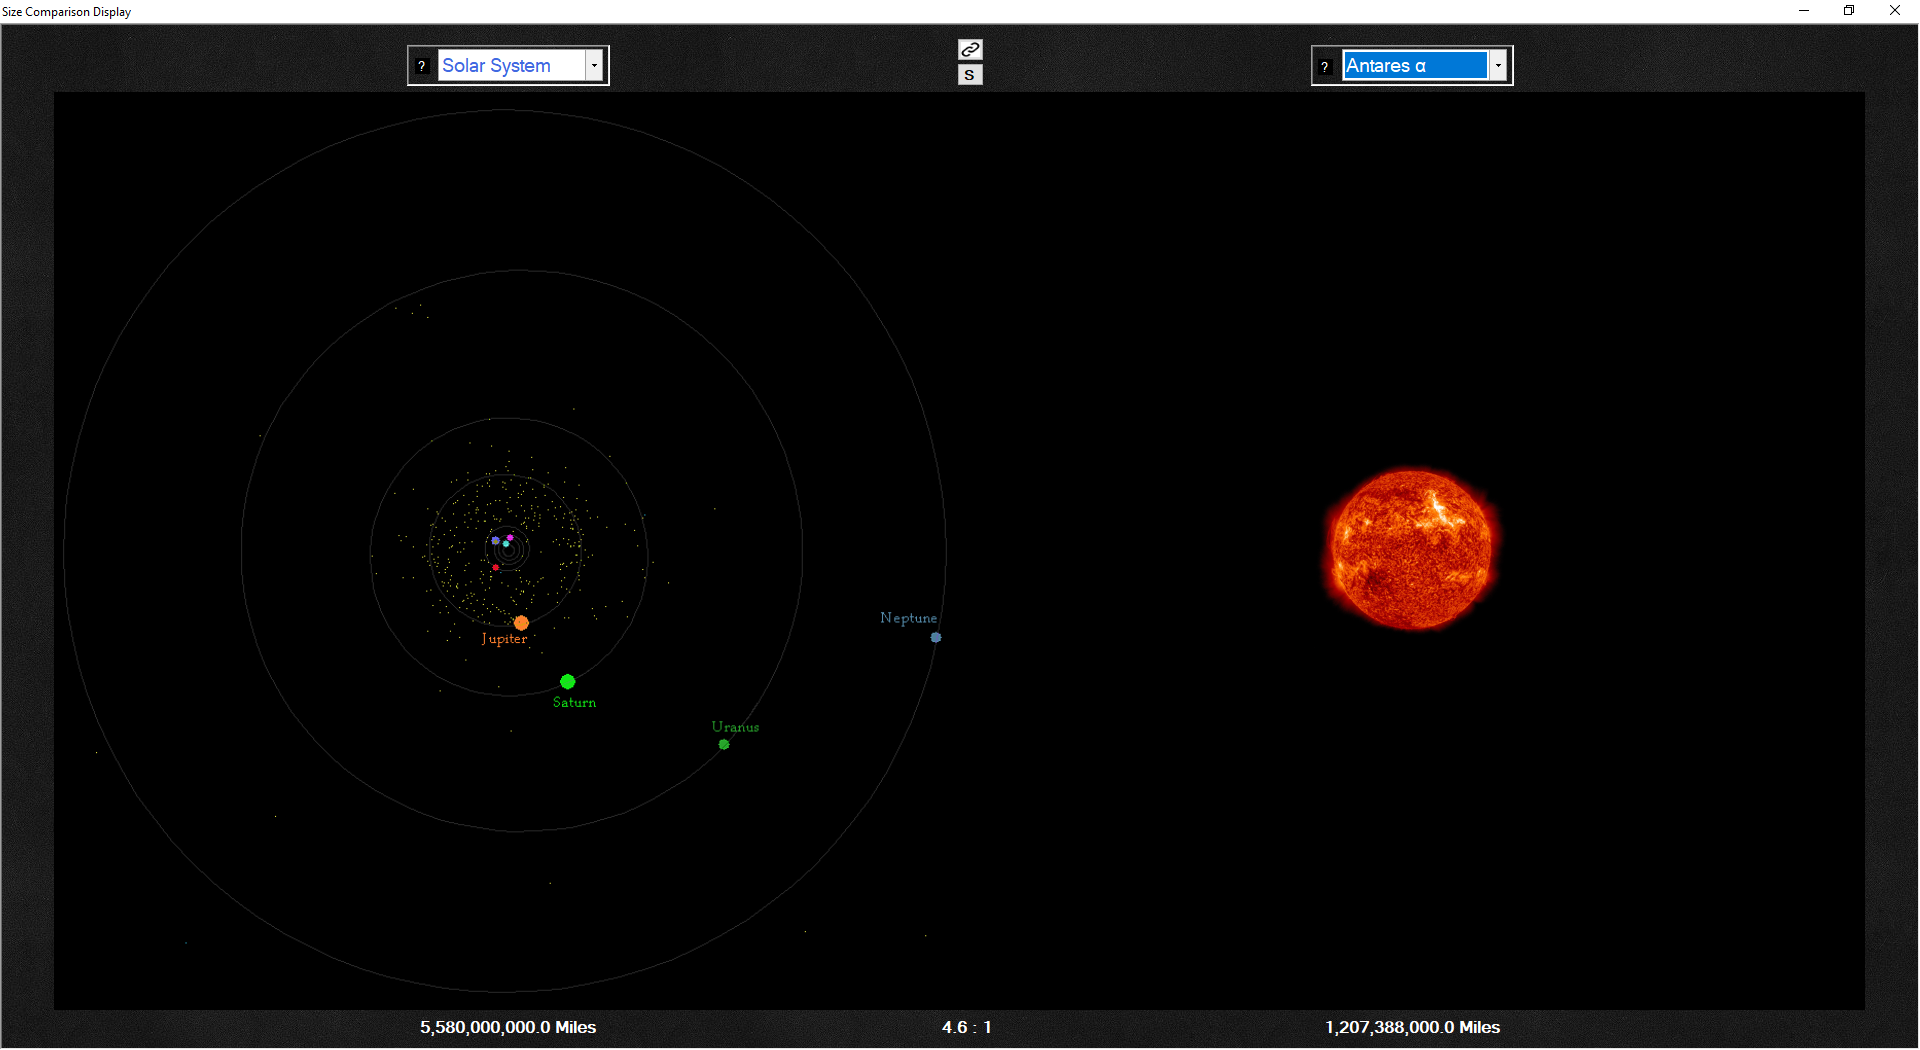
Another example shows how the star Antares is as large as our whole Solar System is out to the planet Jupiter!
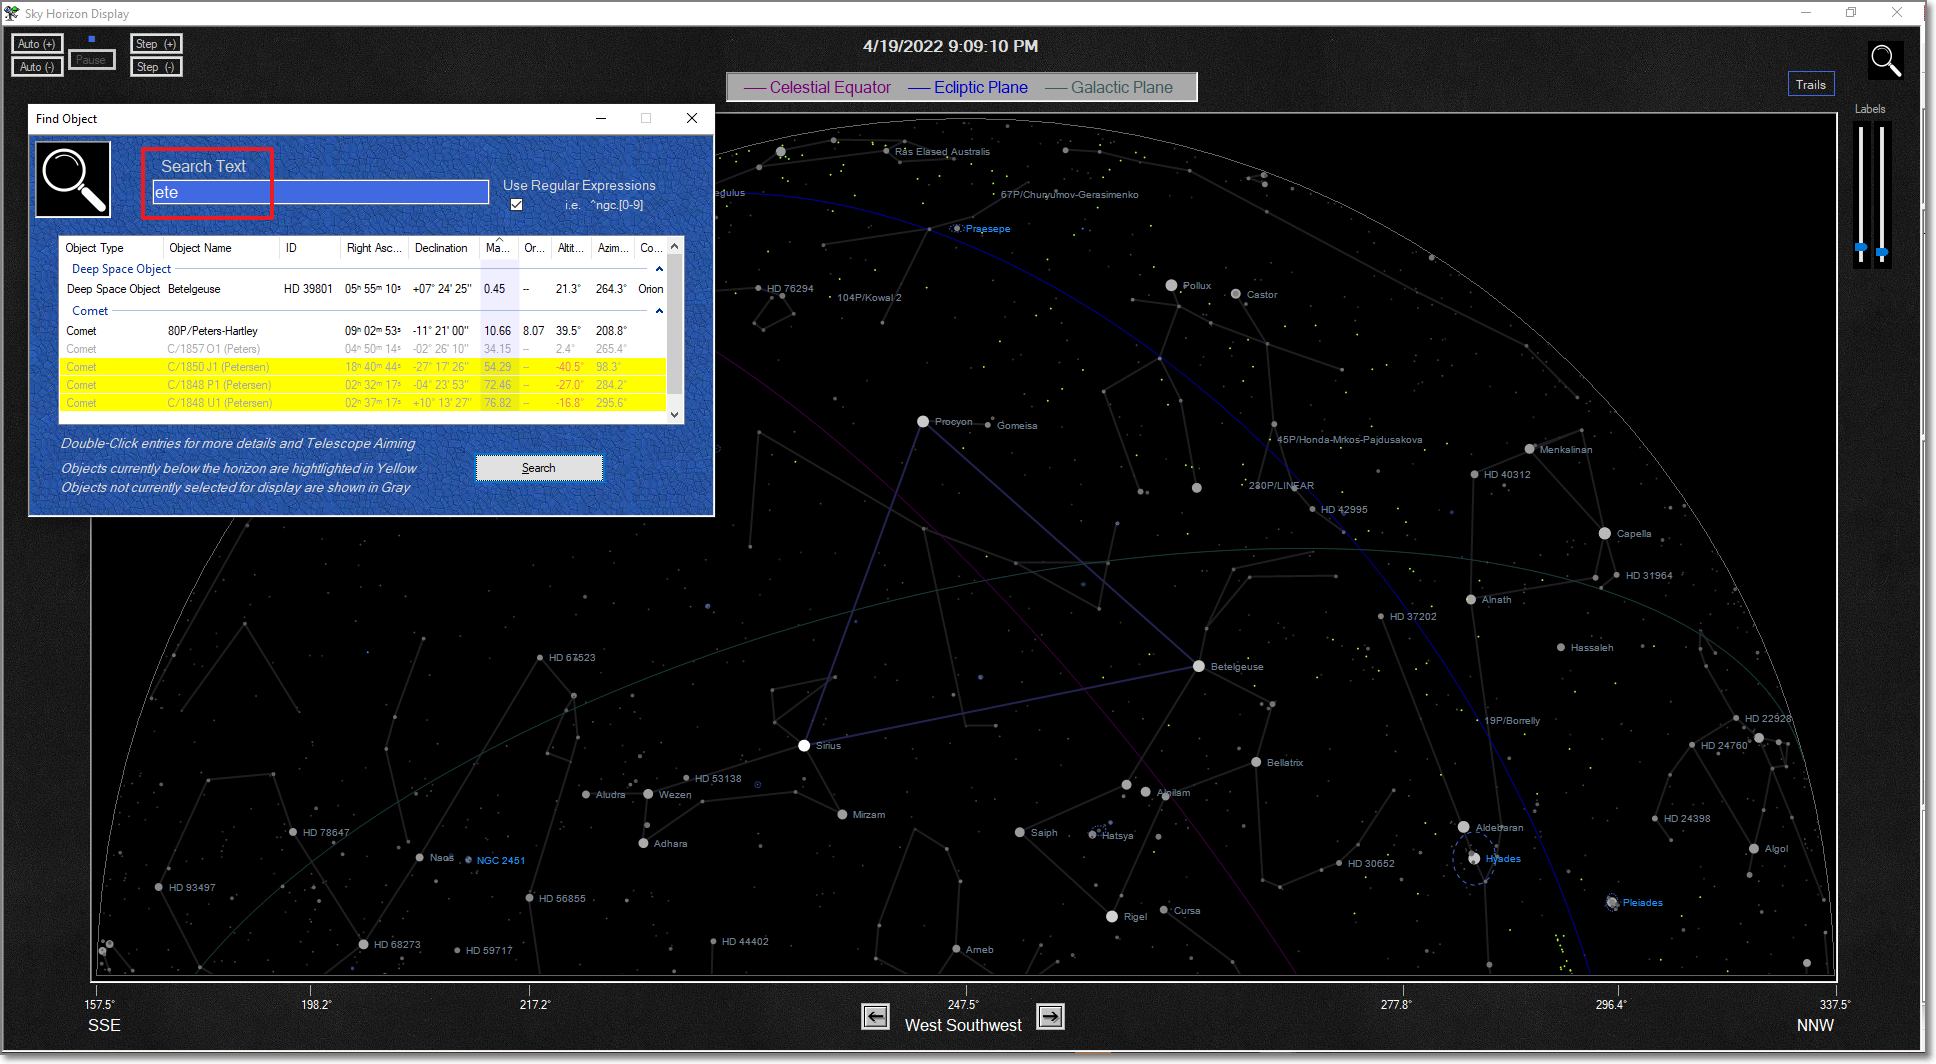
Find Object Feature
"Find Object" gives you the ability to locate Any object on Any of the graphical displays, just by entering a portion of its name.
The search covers the databases of Deep Space object, Comets, and Planets.
In this 1st example screen below, the letters 'ete' were entered as the search text. 1 Star and 5 comets matched their names to those letters
and appear in the search results. Yellow highlighting indicates the objects are currently below the horizon.
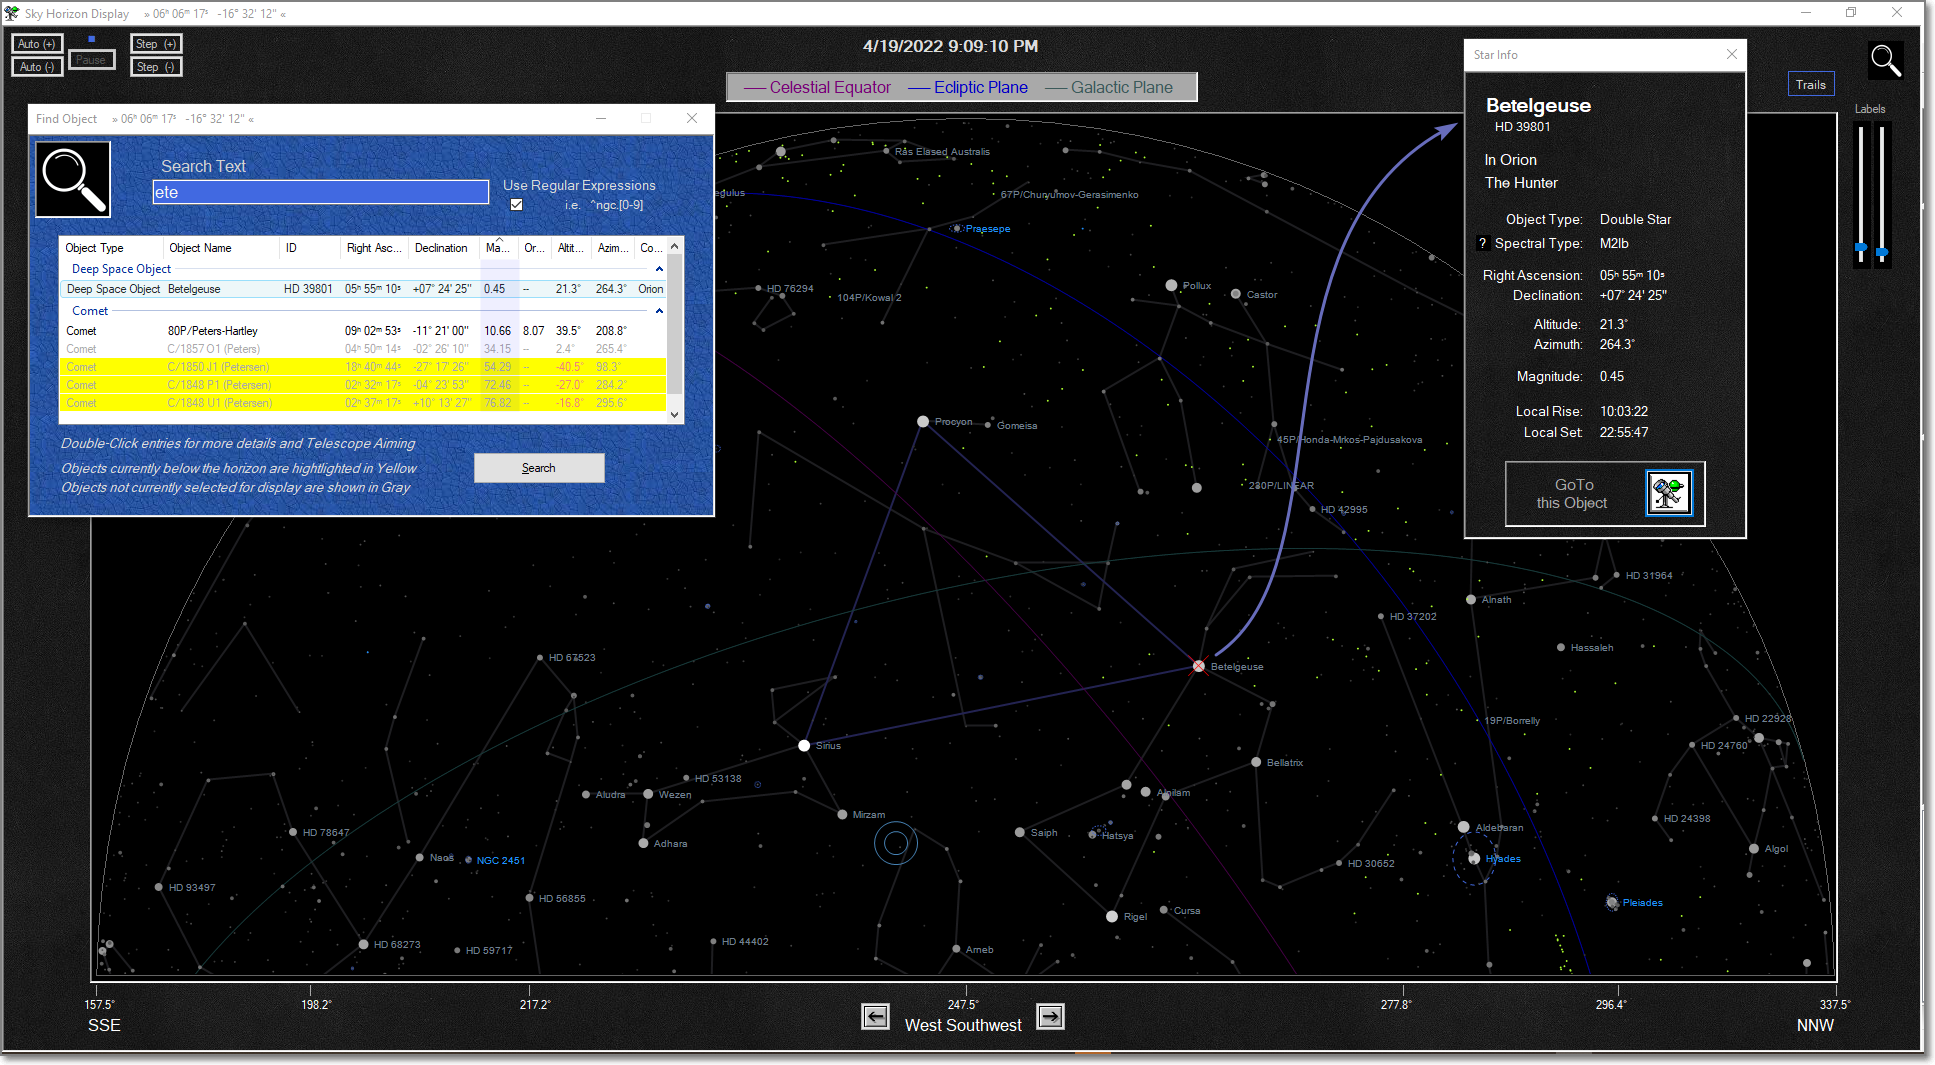
The 2nd screen of the example shows the display after Betelgeuse was selected from the search results.
It is identified with a Marked on the display, as well as a pop-up that gives detailed information about its position.
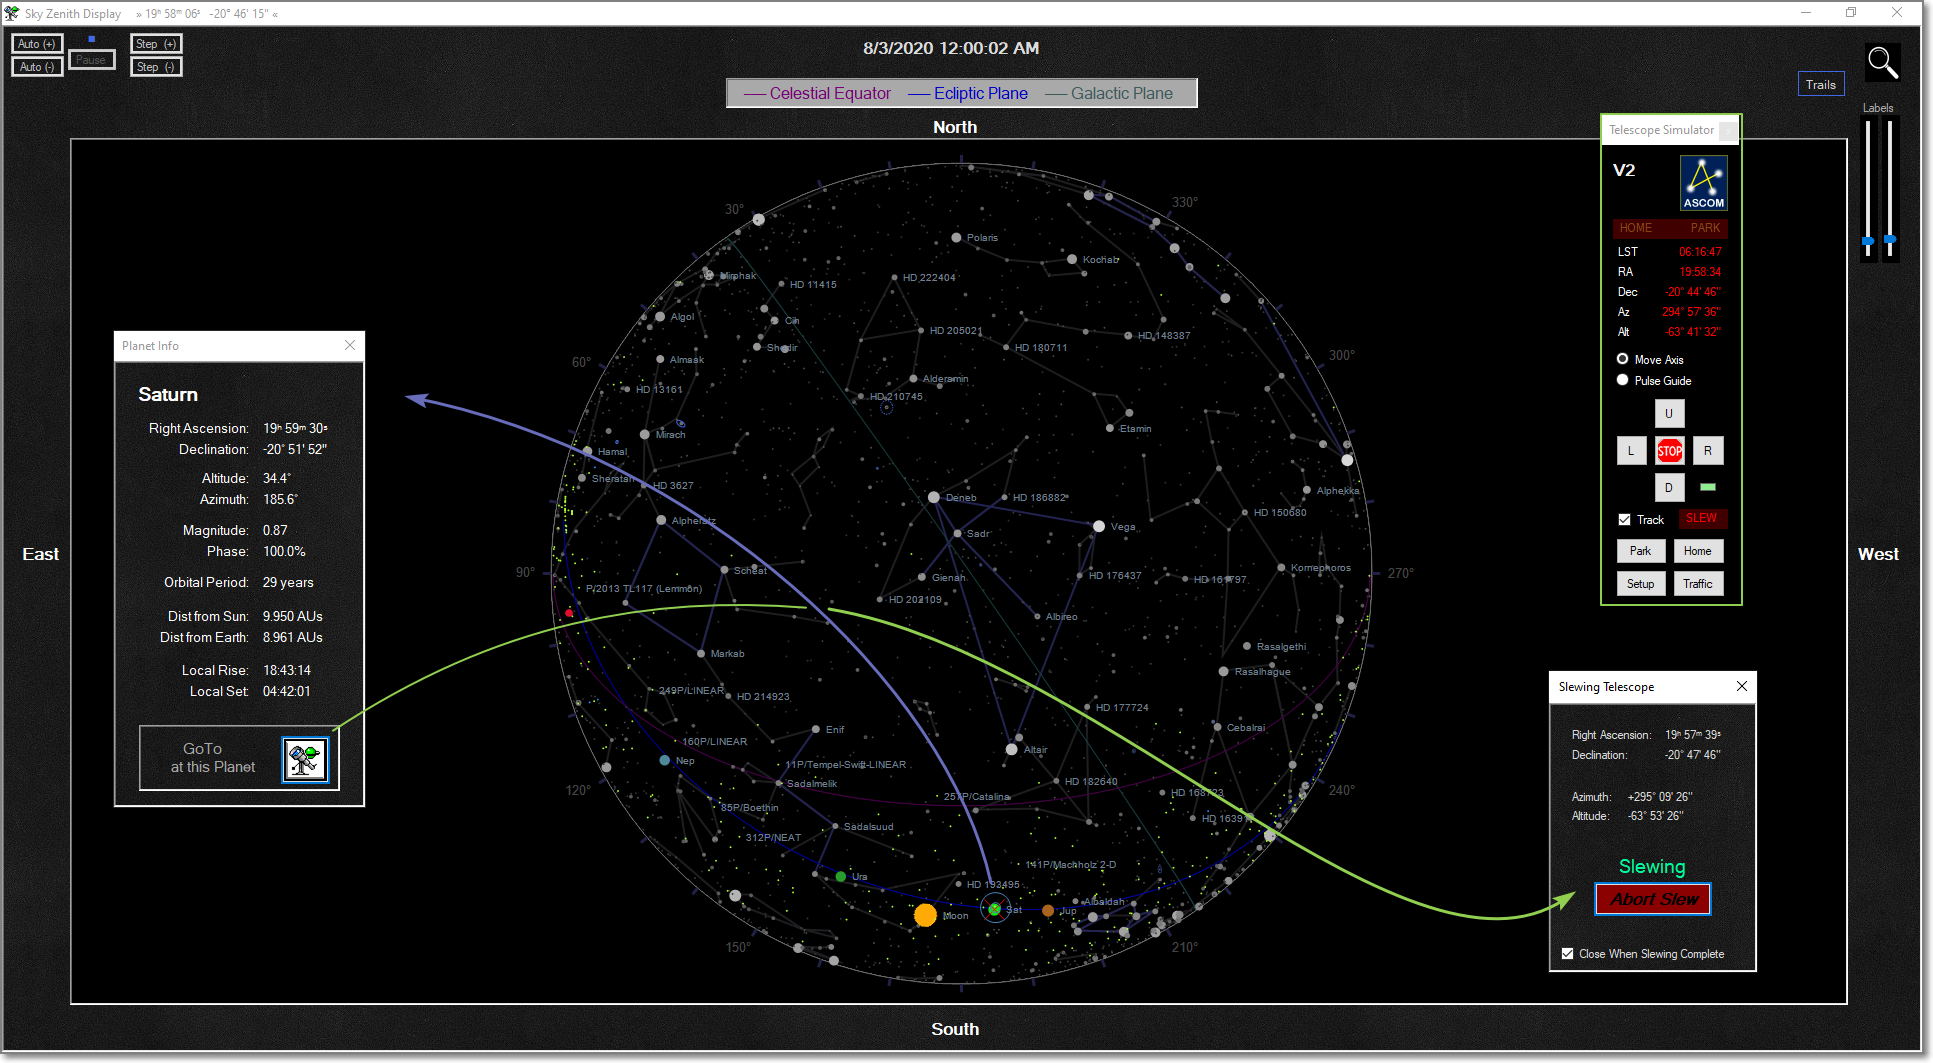
Point Telescope Feature
"Point Telescope" gives you the ability to aim an ASCOM-Controlled-Telescope-Mount at an object that you've selected on the Horizon, Zenith, Star Chart, or Solar System displays.
In the example screen below, Saturn has been selected on the Zenith Display.
The Telescope is shown being driven to point to the Right Ascension / Declination of Saturn.
Whenever the telescope is connected to Hubble-II, a marker is placed on the graphical displays indicating where the telescope is currently pointing.
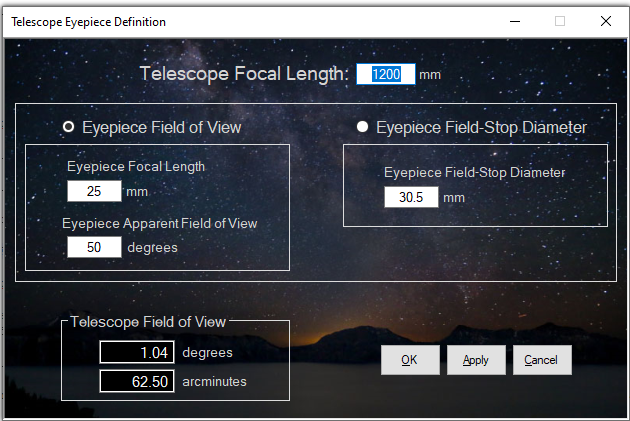
Telescope Eyepiece Definition
The following screen shows how the optics of the telescope's eyepiece can be defined within Hubble-II.
Using these parameters, the marker that indicates the telescope's position will be drawn to a size representative of the telescope's Field Of View.
This gives an indication as to the portion of the sky the telescope will see.
Rise/Set Information Display
This screen shows data related to the Rise and Set times of the Planets and Earth's Moon.
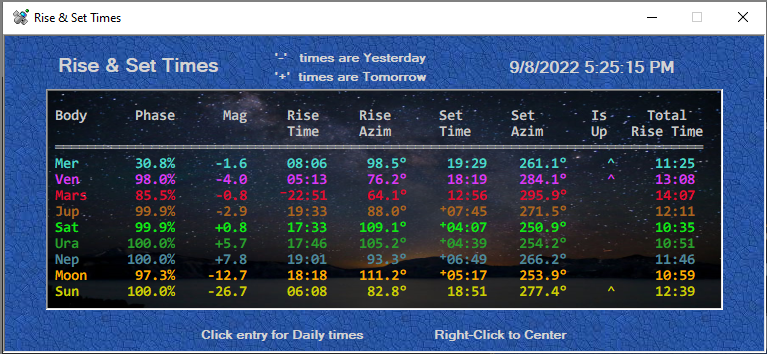
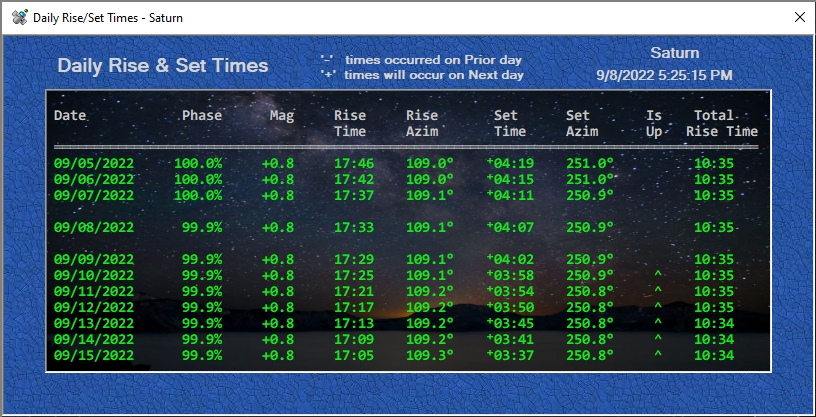
Clicking on any of the Bodies in the Rise / Set Times window shows a new window
with the Past and Future Rise/Set times of that body.
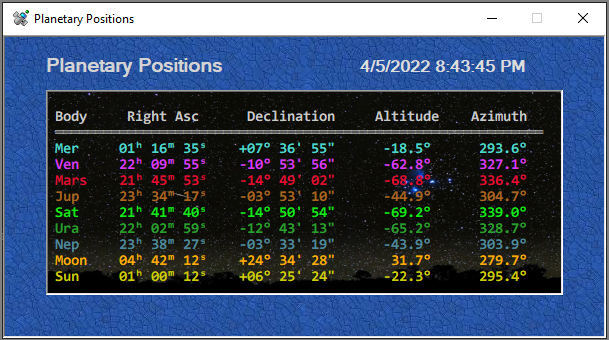
Position Information Display
This screen shows data related to the Positions of the Planets and Earth's Moon.
Knowing their position, particularly their Altitude and Azimuth,
can aid in knowing where to look to find the Planets in the night sky.
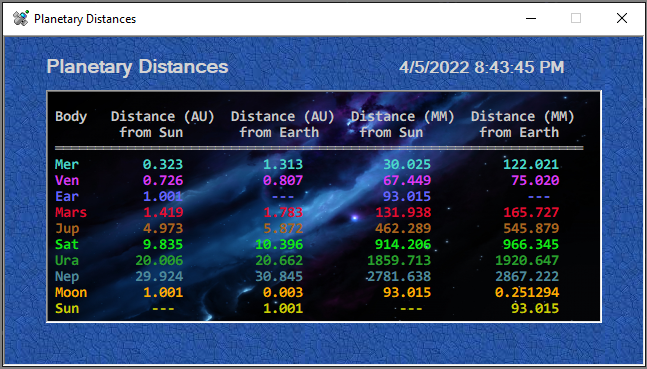
Distance Information Display
This screen shows data related to the Distances of the Planets and Earth's Moon from both the Sun and the Earth.
Preference options will allow the distances to be shown in either English or Metric units.
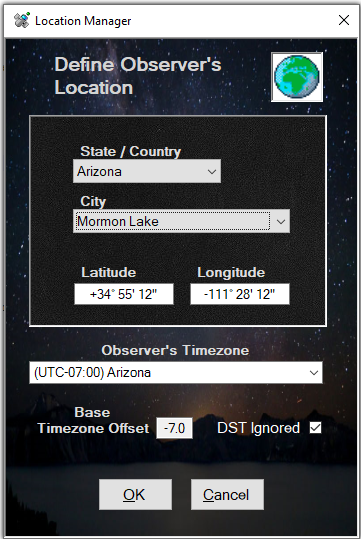
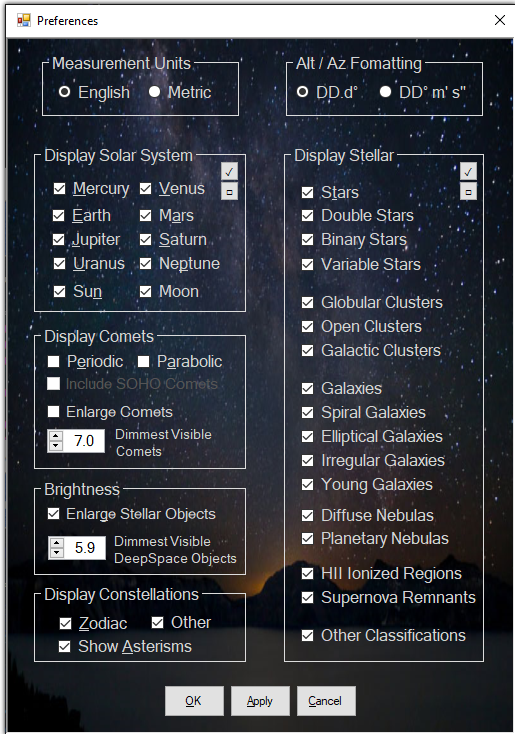
Preference / DateTime / Location Managers
Preferences, Date/Time, and Location settings allow you to control what you will see on the displays.
The above demonstration screens were controlled with these settings.
These settings control the basic parameters of which bodies are displayed, and how numeric values are formatted
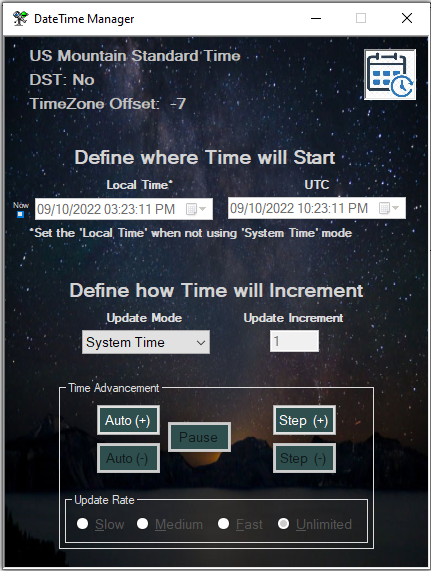
These settings control the Date & Time for which the displays are calculating the positions of bodies. There is also control over how
Time is advanced during motion animations
These settings define where the observer is located on Earth. The location of the observer determines the position of bodies being displayed on the Horizon and Zenith views, as well as Rise/Set and Position data screens